Monday, 28 March 2011

A Lofty Find


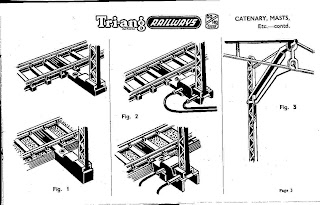
I was clearing out the loft over the weekend and came across a box of train bits and pieces. Mainly it had lots of empty boxes, but in amongst them I was delighted to find a Tri-ang instruction leaflet on the Overhead Power Supply system. I wish I had had it when the R257 wasn’t working! Anyway, here is one of the illustrations which shows how the catenary system works better than I could!
The leaflet is actually based around the first catenary system Tri-ang introduced. This has catenary wire made to look like its suspended from a curving cable. The Catenary we’ve got is just a single, plain wire. However from what I’ve seen, the rest of the system is just the same.

Saturday, 19 March 2011

Eddie Stobart Hauler video

Here's a video of the Eddie Stobart Hauler running on our layout. As you can see we are still experimenting with the video technique! 

Monday, 14 February 2011

Al’s first model train set

The first train set we got for Al was – of course – a Hornby set. In the UK, “toy” trains and Hornby are synonymous. (Yes, “toys”; since Al was only about 4 year old). Hornby sets are available from all sorts of retailers, in real shops, as well as online, and of course in specialist model shops. We went to a small model shop with an upstairs dedicated to sets. Sadly this shop went out of business a few years ago. They were specialists and stocked other makes of train. Names which at the time I hadn't heard of, such as Bachman. You see this was a “model” shop, not a “toy” shop, and if you haven't found out yet there is a big difference between the two.


Hornby's Eddie Stobart Engine
The set was a great success with Al. He had seen a model train loco at his grandfather's and that got him asking about train sets. We found some of my old set – but this train set was his very own. The set we bought for him was Hornby’s R1061, Eddie Stobart Hauler. I think my review score of it would be “mixed”; it has a great little engine which is still one of the fastest in the family collection; it was an “operating” set – in other words it does more than just go around the tracks; and all of Hornby's train sets are great value compared to buying the individual components. 


I think Hornby is in a bit of a fix. It’s managed to build a great revival in its fortunes since the decline of train sets forced the previous owners to give up, and the company which is now Hornby Hobbies was formed. They built that revival, partly on moving manufacture to China, but also on higher degrees of accuracy. They shifted their market focus to adult buyers and away from toy trains. Many of their models are now highly detailed, and they work hard to be true to the original full size versions (what the modelling world calls the “prototype”). And of course adults have more money to spend!

Hornby's Eddie Stobart Goods Container Wagon 

 What I think they have missed is that adult modellers have usually started out as children playing with toy trains. Much of their catalogue is too expensive for kids – in fact even their catalogue itself is pricey on a pocket money budget. They have thankfully introduced the Railroad range in the last couple of years – which is going in the right direction.


Hornby's Eddie Stobart lowmac wagon


So for me the downsides of the Eddie Stobart set were firstly, the branding itself –Hornby and Stobart chose to use their original c.1950’s branding - but it certainly isn’t the brand image which the kids see on every motorway journey these days. Then there are the wagons – the lowmac and the bogie wagon are both low profile models which feel fairly delicate and are often a fiddle to place correctly onto the tracks. 


Finally the operating tipper is a clever piece of engineering, designed to have one edge tip up and unload a pile of – pretty unconvincing – “logs” over the side.  In order to drop over the side, the side rail has to rotate out of the way. But the hinge arrangements are incredibly fine pieces of plastic. With a bit of less than gentle handling, the side comes off, and its then quite a challenge for a child to put it back correctly.


But despite my whingeing, the set has its strong points as well. The inclusion of the Hornby TrakMat I think is a really great invention. It immediately transforms the track into a fantasy setting. It helps you visualise the setting of the railway – the platforms, the engine sheds, and the roadways to service the railway. And the little Eddie Stobart Loco, as I’ve already said, is still one of the fastest in the family collection. So we still look out for the Eddie Stobart lorries on the motorway as we travel around the country, and as we see them, every one is a reminder of the train set waiting for us to get back home again!
Saturday, 5 February 2011

Train delayed - Haggis on the track!

We survived the Burns Night, but our test layout didn't. (It was after all on the dinner table, and I didn't think it was quite up to hauling the haggis around the table!). I did manage to catch a few quick camera shots, before it all disappeared. 

Tri-ang R257 on straight section showing catenary
 The first pic shows the train on a straight. You can see how the catenary (overhead wire) sits nicely over the middle of the pantographs. The trouble starts when you drive your train around the bend. 


diagram showing how straight catenary would run on
curved track
Here is a diagram drawn using XtrakCad which shows how a line drawn from centre line at one end of a curve to the centre line at the other end (the black line) actually veers off to the inside of the curve.  The pantographs won’t be able to reach across to this line and so won't collect any power. One alternative would be to split the curve into two – see the red lines. But even this line gets close to the edge line of the pantograph. (This would be the equivalent of the Marklin recommendation for a post every 22.5°).


Tri-ang R257 on curved track showing catenary
The second pic shows the train on a curve. You can see how close the wire is to the edge of the pantograph (where I have added a small yellow arrow). What happens in practice is, unless you get it right, the pantograph slips off the wire. As it is sprung, it extends to its full height, and often continues to pick up power by scrapping along the side of the wire – until CRASH – it hits a post.


As you can see from the video of a couple of posts ago we did manage to get it right. First I had to straighten the individual strands of wire I had bent as a kid. One trick I picked up on the internet was to roll the wire – this shows where the bends actually are. It's quite a painstaking job to bend them back. Our test circuit was built using Tri-ang R483, first radius curves, with three straight sections (R480/R481) on either side of the oval. Without getting every “straight” section of wire really straight, the wire didn't quite meet in the middle. In the end I was able to ease some sections of the wire apart inside the connecting clips. This isn't ideal of course – but it worked!

Tri-ang catenary mast (R419)
One other problem I had was with the mast clips – the little pieces of nylon which hang down from the top of the post. Here is a picture of one of the problem mast clips - if you look carefully you can see the wire is sitting behind the clip. The idea is that you push the wire up into the clip and the nylon springs closed around it, leaving the bottom edge free to touch the pantographs. But several of my old masts - like this one - had clips which just pushed the wire back out and wouldn't grip it. If anyone has any ideas how this might be solved I'd love to hear them.


We now have to work out just how to link in a Tri-ang overhead powered track section can fit into our main layout. We'll let you know if we solve that one!

And in the meantime, the words of Rabbie Burns’ Address to a Haggis are still ringing in my ears – “great Chieftain of the pudding race” – the proof of our pudding was watching the R257 zip around the track using overhead power with head lights blazing!

Sunday, 30 January 2011

Keeping on the straight and narrow


Where we live, trains are run on electric power which comes from a third rail on the ground – the good old Southern Electric Railway, as it used to be in my youth. But for most people, electric trains means overhead wires. That's what makes catenary on a model layout so obvious. Yet as I discovered, even getting electricity to run smoothly around metal track is hard enough – adding in the complexity of suspending wires above the track makes life much more difficult. My guess is, that is why Hornby dropped catenary, and now only produces models with non-functioning pantographs (the roof top power collectors).
  
It wasn’t always like that. Tri-ang had two attempts at working catenary. Nowadays, Marklin produces a working catenary set, and I've seen some ads suggesting Dapol might have something as well. I haven't tried either. But when I was a kid, I had a set of the second generation of the tri-ang catenary system. After all I had a train which needed it – yes as far as I was concerned – it was needed. And so I am the proud owner of an R416 15” catenary set dating from the mid 1960’s. But could I find it? Of course not. And I also remembered just what a pain it had been trying to get it to work properly when I was a kid. Back in those days, we didn’t have space to have a permanent layout – so every time I set up the trains, it meant relaying the track, and re-installing the catenary.


My main memory about it was the problems I had in trying to get the catenary to run around curves. As a kid I was bending the wires to follow the curve. But the more I researched it now, the more I became convinced that that had been the problem when I was a kid.
Real wires on real railways do not turn bends in mid-air. If they curve its because the weight in the middle between two support posts causes a downward curve. Between each support post they run straight. This is how the Marklin system works, where they recommend a support every 22.5 degrees of turn.


Well I had the engine with the pantographs. I had my son ask “what are they for?” whilst my daughter watched me closely for the answer. But no catenary to show them. Ebay to the rescue. I managed to buy another R416 set of Tri-ang catenary. Time then passed – work has this habit of getting in the way of a smooth running model train set! And before I could find the time to set up the new set, my son discovered my original set, hidden away in some boxes. Now we've got two sets of 15 feet each – and we'll have to find some place to test them! (see the video in the last post)

Tuesday, 25 January 2011

Electric Overhead

So our test run worked - finally. In the shot is our Tri-ang R257, capable of running powered from the track or from catenary - the posh name for overhead wires!


Its a great model - but frankly a bit unlikely. One of my discoveries in coming back to train sets is the great divide - between modellers who strive for exact replication of real life, as against most of the kids I know (old pretend kids as well as real kids) for whom the toy's the thing. This model was based on an Australian diesel engine, but Tri-ang added the "pantographs" - the roof top collectors - to make it work with overhead power supplies. 


A couple of weeks ago we took this model to a local train fair. I had finally given up trying to get it to run. There we met Dr John the Train Doctor - very clever at fixing model trains. A friend of his told me that this model was altered by Tri-ang to try and break into the American market, where overhead power was considered essential. He said the Americans didn't take to this model and surplus stock was brought back to the UK. Meanwhile Dr John was checking out the inner workings of the model. The problem, it turned out, was simple - inside the motor there is a wire spring, one side of which is sheathed. The sheath prevents a short circuit - but I hadn't spotted that the sheath had worked itself back so the spring was shorting out the  two sides of the motor. Easily fixed - if you know how. (I plan to come back to the inner workings of the R257 in another posting).


But our problems didn't just end with the train itself. We had enormous problems with setting up the catenary. The wires have to sit above the centre line of the track. That's easy when the track is straight, but on a curve you have to bend the wire by hand to match the radius of the curve. As the train moves around a bend, the pantographs move away from the centre line. If the wire is too close to one side or the other, the pantographs slip past the wire and then - CRASH - the pantographs hit the next catenary mast. I seem to have spent days bending and re-bending the wires to get the curve just right. And now - it works - and its a marvel!


The Tri-ang R257, with "Tri-ang Railway" markings is said to be very rare these days. Catenary sets from Tri-ang are also a bit difficult to track down - ebay had a couple in the last three or four days, but both were incomplete sets. I have always loved this train - and there is something special about seeing it powered from above. My son and daughter have loved working with me to get the whole setup running - and there is something special about that as well!