E missed out
because Dad forgot to ask her what her train set wishes were. So here as a late
addition is what she would really like: a Hornby Devon Flyer train set – which she
says looks really good!
Saturday, 24 December 2011
Thursday, 22 December 2011
Christmas Wishes
 Its probably a bit late to be thinking of what we want for
Christmas, but here are a few of the items we’d like the Reindeer Express to
deliver.
Its probably a bit late to be thinking of what we want for
Christmas, but here are a few of the items we’d like the Reindeer Express to
deliver.
I’d love a rake of electric motor units (“EMU”s) in BR
Southern Region green. We’ve got two carriages that are pulled by locos, but
they are in different scales (HO and OO) and look out of place together!
The Hornby Trackmaster software sounds good, although I
haven’t seen a proper review of it yet. I’ve spent a lot of time searching for
software to help plan layouts, and they all have drawbacks – Hornby’s previous
attempts have been interesting, and fun, but somehow tended to stop just before
they were really useful!
We would all love a really impressive steam loco and tender
set. But they are certainly not cheap at roughly £130 plus!
Al would like a “cleaner train”. We’ve talked about track
maintenance in the blog, and one option is to have a train clean the track. There
are some really cool examples (including one by Dapol) which have tanks to
store cleaning fluid, and “hoover” type vacuums” which pick up power from the track.
But overall the things we’d probably love most would be more
space for our layout (preferably in the warm rather than out in our garage) and
more time to spend “playing” trains together.
Wherever you are and whatever you are up to in train set
scale or in real life, we wish you a Happy Christmas.
Ps if you are still looking for your own Christmas gift (to
give away or to keep for yourself) check out the train sets sold by Hornby and
Bachman – they are great value compared to buying the individual items, and you
will often find some sets being offered at a big discount around Christmas.
pps thanks to "callmestacy" via photobucket for the tree picture.
Friday, 16 December 2011
Wheels of Progress
After the Railway Maintenance Working Party had done such
sterling work in wheel cleaning Al had taken the cleaned locos and run them
around our layout. One of our pride and joys is an old Tri-ang R653 loco, a
2-6-2 SNCF black steam model (a Continental “prairie” model from the 1960’s).
It’s the most majestic looking loco we have (Al would probably vote for the
Hitachi bullet train, but I am an old enough fogey to feel nostalgia for the
steam engine!). It was the last of the three cleaned locos to be test run, and
he called me in to show it running. But - it stopped.
 |
| A Tri-ang R653, a Continental Prairie in French livery |
Now there are lots of possible reasons for the stoppage. It
was stopping near to some points. One of the constructional differences between
original Tri-ang and modern Hornby is that the track is smaller in height. It
is more “finescale” in the jargon. The flanges on the wheels (the bigger bits
that drop down to the side of the rail) were made to suit older higher track.
When a Tri-ang loco goes over a point there is a piece in the middle – called
the “frog” where the two running lines come to meet. The groove in these frogs
is not deep enough for the depth of the flanges on most Tri-ang locos. This
means the main wheel is lifted up and loses contact with the rail – reducing
the transfer of power from the rail to the engine. This usually results in a
“stutter” in the running of the engines around the track. Since the problem appeared to be happening
just after the points, I wondered if that was the cause. We ran the loco a few
more times.
 |
| If you look carefully you can see the dirt on the wheels.You can also see the deep flange which makes it difficult to run on modern track |
Yes that’s right – we ran it again – even though it had
stopped. What we found was that if we turned off the Hornby power controller
for about a minute, it seemed to reset things so that it could run the loco
again. And on the next test run , the loco stopped again, but nowhere near the
points. The way our weekends go we didn’t have time to do any more testing, so
the problem remains a mystery at the moment. I am wondering if the engine is
somehow building up electrical resistance so that eventually the power
controller cuts out. This does seem to be a feature of the Hornby rail
controller. More research is called for – but that’s going to mean finding some
more time to spend at the trackside!
Saturday, 3 December 2011
Geometric Designs
In a previous post I talked about track geometry. I explained about the problem I had had with a full straight track section being used instead of two quarter sections. Here is an illustration which shows the difference between a quarter section (R610), two quarter sections joined together and a full straight (R600) - all of these are Hornby current track sections.

In looking back, I remembered that it took me some time to realise that “track geometry” was the magic phrase (the one to put into google) to help me work out how to get a layout working properly. I suspect too many of us would rather leave “geometry” as a vaguely remembered school topic long since relegated for much more useful things.

In looking back, I remembered that it took me some time to realise that “track geometry” was the magic phrase (the one to put into google) to help me work out how to get a layout working properly. I suspect too many of us would rather leave “geometry” as a vaguely remembered school topic long since relegated for much more useful things.
As a kid I remember pulling out my trainset and fitting all
the track together from time to time, and being mystified why some curves
seemed to end up in one place and others went somewhere else. With all the
ingenuity of a 10 year old, this was seldom a problem – pushing it a bit
usually worked, after a fashion!
As a now adult helper to Al and E, this “push until it does
fit” approach no longer washes. I had to find out what was going on. It fairly
quickly became apparent that Hornby, and Tri-ang before them, make curves that
allow you to build three concentric circles (circles within circles). In fact
Hornby introduced a fourth circle not so long ago. These go by the names of first, second third
and now fourth radius. In each radius it takes eight standard curve sections to
create a circle, and if you had all four circles they would sit one inside the
other with 67 mm between them - enough clearance to allow trains to go around
them without interfering with the trains on the next circle. Hornby have a useful diagram showing how the different pieces fit together; you can find it on the Hornby website, but its not that obvious so you might like the direct link just to the diagram, which is
Wednesday, 30 November 2011
When the dust settled
I left off the blog at the point where I had got the layout
running again after the dust had all been cleared away. But summer intervened,
and it’s taken us a long time to get back to the train set again. And at first
it seemed like we were going to have all sorts of problems – the first three
locos I tried to run all had problems of one sort or another – which I put down
to poor conductivity on the rails. Then I came across one of my son’s star
locos – a Hornby class 08 diesel model (an R156). And it sped around the track
like there was no tomorrow! (Not bad for a shunter which according to some
sources was only supposed to run at 20 mph in real life!).
Now one difference was that the diesel had been kept out of
sight in a storage drawer. It is also one of the more modern models, and one of
the more recent additions to our collection. So the problem seemed to be more
with the locos than the rails. I thought I would test the power running through
the rails at different points using a small cheap multimeter I had picked up
from Maplin for about a tenner. It’s a mysterious gadget if your knowledge
about electrics is as rusty as mine is! But I managed to get consistent
readings of 13v pretty much anywhere I tested (using a straight 12 V input from
a small transformed rather than the Hornby power control equipment). It was
much later that I worked out that I should have been testing current in amps,
not the voltage! In any event it persuaded me to look harder at the loco’s
rather than the rails.
 |
| Hornby R156 - a Class 08 Diesel |
So I picked up the Eddie Stobart loco intending to add a
little more oil to see if that would improve things. But before I could do that
I noticed the state of the wheels – filthy! And sure enough the wheels on the
other locos’s were all in a pretty poor state too. So there we were on Saturday
afternoon. Mum was out at the shops, Al had finished his homework and E had
been to ballet and gotten back again. “What are your doing, Dad?” they asked,
and soon enough, all three of us were sitting around the breakfast table, fully
engaged in our Railway Maintenance Working Party. Each of us worked on the
wheels of a different loco, just rubbing them gently with a paper tissue; a pile
of blackened tissues as testament to our work. Mum came back, so we only had a
quick chance to do some test running – and what an improvement.
Friday, 29 April 2011
A Shower of Debris
I have spent a lot of time recently clearing our loft to allow new insulation to be laid, and the insulation installers finally arrived last week. They were also filling our cavity walls, and about the first thing they said concerned our train set layout. “That will take a bit of moving “.
Our train set is set up in our garage, and I hadn’t expected them to try and do anything to the garage wall. However they had other ideas. They wanted to drill two holes just above the layout. “Just be a bit of dust”, they said. I didn’t believe them!
As fast as I could I removed all the rolling stock, then the few buildings we have on the layout. Next came the track supports for the elevated section my son had constructed. Finally I went back and removed the two level crossings, and then all he end tracks with buffers. Finally I felt there was nothing they could do much harm to by leaning over and on to the layout. I still covered it with a dust sheet. And then, they drilled two holes before declaring the wall in question was a single skin without any cavity to be filled; it had all been a needless waste of time. But with just two test holes the brick dust still went everywhere. In the end I had to use a vacuum to try and brush it all up.
So today I finally managed to put everything back. And in doing so came up against one of those intriguing aspects about train sets I hadn’t really understood as a child; the importance of track geometry. I discovered that we had somehow put in a single straight section (R600 length 168mm) instead of two quarter length straights (R610 length 38mm). Now those of you quick with maths might notice that 4 times 38 doesn’t equal 168, so why they are called quarter straights is a bit of a mystery; as is the absence from the catalogue of a half straight.
The impact of this extra 92mm of straight meant that the curve of the track at one end didn’t follow the printed image on the trakmat, and extended right to the edge of the mat. Probably more importantly, it also puts strain on the junctions of the track pieces, opening up gaps between the track which causes the train wheels to judder and reduces electrical conductivity. The current should still pass through the rail joiners, but it must be a better connection if the track itself joins up.
So what this shows is that the track itself appears quite flexible – you can make the track link up even if you are not following the official geometry exactly; but only do so at your peril! The more you diverge from the geometry, the more difficult it becomes to link up other sections, the more likely you are to have derailments and crashes because of the gaps between tracks, and the more difficult it will be to get your electrical current flowing freely throughout the layout.
Friday, 8 April 2011
Aussie Rules!
I've always found the website at www.modeltrains.net.au/Hornby to hold a wealth of information about Tri-ang and Tri-ang/Hornby models, much of it very hard to find from somewhere else. So I was really pleased to be able to provide them with some of the details of the Overhead Power system which they didn't have. And now Andrew over there has placed a link to this blog - which is really kind!.Thanks you, Andrew. Just goes to show, we might not agree on Cricket, or even how to play football, but Aussies and Brits can work together on model railways!
Monday, 28 March 2011
A Lofty Find
I was clearing out the loft over the weekend and came across a box of train bits and pieces. Mainly it had lots of empty boxes, but in amongst them I was delighted to find a Tri-ang instruction leaflet on the Overhead Power Supply system. I wish I had had it when the R257 wasn’t working! Anyway, here is one of the illustrations which shows how the catenary system works better than I could!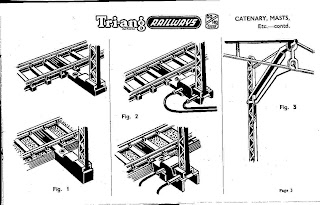

The leaflet is actually based around the first catenary system Tri-ang introduced. This has catenary wire made to look like its suspended from a curving cable. The Catenary we’ve got is just a single, plain wire. However from what I’ve seen, the rest of the system is just the same.
Saturday, 19 March 2011
Eddie Stobart Hauler video
Here's a video of the Eddie Stobart Hauler running on our layout. As you can see we are still experimenting with the video technique!
Monday, 14 February 2011
Al’s first model train set
The first train set we got for Al was – of course – a Hornby set. In the UK, “toy” trains and Hornby are synonymous. (Yes, “toys”; since Al was only about 4 year old). Hornby sets are available from all sorts of retailers, in real shops, as well as online, and of course in specialist model shops. We went to a small model shop with an upstairs dedicated to sets. Sadly this shop went out of business a few years ago. They were specialists and stocked other makes of train. Names which at the time I hadn't heard of, such as Bachman. You see this was a “model” shop, not a “toy” shop, and if you haven't found out yet there is a big difference between the two.
 |
| Hornby's Eddie Stobart Engine |
The set was a great success with Al. He had seen a model train loco at his grandfather's and that got him asking about train sets. We found some of my old set – but this train set was his very own. The set we bought for him was Hornby’s R1061, Eddie Stobart Hauler. I think my review score of it would be “mixed”; it has a great little engine which is still one of the fastest in the family collection; it was an “operating” set – in other words it does more than just go around the tracks; and all of Hornby's train sets are great value compared to buying the individual components.
I think Hornby is in a bit of a fix. It’s managed to build a great revival in its fortunes since the decline of train sets forced the previous owners to give up, and the company which is now Hornby Hobbies was formed. They built that revival, partly on moving manufacture to China, but also on higher degrees of accuracy. They shifted their market focus to adult buyers and away from toy trains. Many of their models are now highly detailed, and they work hard to be true to the original full size versions (what the modelling world calls the “prototype”). And of course adults have more money to spend!
 |
| Hornby's Eddie Stobart Goods Container Wagon |
What I think they have missed is that adult modellers have usually started out as children playing with toy trains. Much of their catalogue is too expensive for kids – in fact even their catalogue itself is pricey on a pocket money budget. They have thankfully introduced the Railroad range in the last couple of years – which is going in the right direction.
 |
| Hornby's Eddie Stobart lowmac wagon |
So for me the downsides of the Eddie Stobart set were firstly, the branding itself –Hornby and Stobart chose to use their original c.1950’s branding - but it certainly isn’t the brand image which the kids see on every motorway journey these days. Then there are the wagons – the lowmac and the bogie wagon are both low profile models which feel fairly delicate and are often a fiddle to place correctly onto the tracks.

But despite my whingeing, the set has its strong points as well. The inclusion of the Hornby TrakMat I think is a really great invention. It immediately transforms the track into a fantasy setting. It helps you visualise the setting of the railway – the platforms, the engine sheds, and the roadways to service the railway. And the little Eddie Stobart Loco, as I’ve already said, is still one of the fastest in the family collection. So we still look out for the Eddie Stobart lorries on the motorway as we travel around the country, and as we see them, every one is a reminder of the train set waiting for us to get back home again!
Saturday, 5 February 2011
Train delayed - Haggis on the track!
We survived the Burns Night, but our test layout didn't. (It was after all on the dinner table, and I didn't think it was quite up to hauling the haggis around the table!). I did manage to catch a few quick camera shots, before it all disappeared.
 |
| Tri-ang R257 on straight section showing catenary |
The first pic shows the train on a straight. You can see how the catenary (overhead wire) sits nicely over the middle of the pantographs. The trouble starts when you drive your train around the bend.
 |
| diagram showing how straight catenary would run on curved track |
Here is a diagram drawn using XtrakCad which shows how a line drawn from centre line at one end of a curve to the centre line at the other end (the black line) actually veers off to the inside of the curve. The pantographs won’t be able to reach across to this line and so won't collect any power. One alternative would be to split the curve into two – see the red lines. But even this line gets close to the edge line of the pantograph. (This would be the equivalent of the Marklin recommendation for a post every 22.5°).
 | |
| Tri-ang R257 on curved track showing catenary |
The second pic shows the train on a curve. You can see how close the wire is to the edge of the pantograph (where I have added a small yellow arrow). What happens in practice is, unless you get it right, the pantograph slips off the wire. As it is sprung, it extends to its full height, and often continues to pick up power by scrapping along the side of the wire – until CRASH – it hits a post.
As you can see from the video of a couple of posts ago we did manage to get it right. First I had to straighten the individual strands of wire I had bent as a kid. One trick I picked up on the internet was to roll the wire – this shows where the bends actually are. It's quite a painstaking job to bend them back. Our test circuit was built using Tri-ang R483, first radius curves, with three straight sections (R480/R481) on either side of the oval. Without getting every “straight” section of wire really straight, the wire didn't quite meet in the middle. In the end I was able to ease some sections of the wire apart inside the connecting clips. This isn't ideal of course – but it worked!
 |
| Tri-ang catenary mast (R419) |
One other problem I had was with the mast clips – the little pieces of nylon which hang down from the top of the post. Here is a picture of one of the problem mast clips - if you look carefully you can see the wire is sitting behind the clip. The idea is that you push the wire up into the clip and the nylon springs closed around it, leaving the bottom edge free to touch the pantographs. But several of my old masts - like this one - had clips which just pushed the wire back out and wouldn't grip it. If anyone has any ideas how this might be solved I'd love to hear them.
We now have to work out just how to link in a Tri-ang overhead powered track section can fit into our main layout. We'll let you know if we solve that one!
And in the meantime, the words of Rabbie Burns’ Address to a Haggis are still ringing in my ears – “great Chieftain of the pudding race” – the proof of our pudding was watching the R257 zip around the track using overhead power with head lights blazing!
Sunday, 30 January 2011
Keeping on the straight and narrow
Where we live, trains are run on electric power which comes from a third rail on the ground – the good old Southern Electric Railway, as it used to be in my youth. But for most people, electric trains means overhead wires. That's what makes catenary on a model layout so obvious. Yet as I discovered, even getting electricity to run smoothly around metal track is hard enough – adding in the complexity of suspending wires above the track makes life much more difficult. My guess is, that is why Hornby dropped catenary, and now only produces models with non-functioning pantographs (the roof top power collectors).
It wasn’t always like that. Tri-ang had two attempts at working catenary. Nowadays, Marklin produces a working catenary set, and I've seen some ads suggesting Dapol might have something as well. I haven't tried either. But when I was a kid, I had a set of the second generation of the tri-ang catenary system. After all I had a train which needed it – yes as far as I was concerned – it was needed. And so I am the proud owner of an R416 15” catenary set dating from the mid 1960’s. But could I find it? Of course not. And I also remembered just what a pain it had been trying to get it to work properly when I was a kid. Back in those days, we didn’t have space to have a permanent layout – so every time I set up the trains, it meant relaying the track, and re-installing the catenary.
My main memory about it was the problems I had in trying to get the catenary to run around curves. As a kid I was bending the wires to follow the curve. But the more I researched it now, the more I became convinced that that had been the problem when I was a kid.
Real wires on real railways do not turn bends in mid-air. If they curve its because the weight in the middle between two support posts causes a downward curve. Between each support post they run straight. This is how the Marklin system works, where they recommend a support every 22.5 degrees of turn.
Well I had the engine with the pantographs. I had my son ask “what are they for?” whilst my daughter watched me closely for the answer. But no catenary to show them. Ebay to the rescue. I managed to buy another R416 set of Tri-ang catenary. Time then passed – work has this habit of getting in the way of a smooth running model train set! And before I could find the time to set up the new set, my son discovered my original set, hidden away in some boxes. Now we've got two sets of 15 feet each – and we'll have to find some place to test them! (see the video in the last post)
Saturday, 29 January 2011
Tuesday, 25 January 2011
Electric Overhead

Its a great model - but frankly a bit unlikely. One of my discoveries in coming back to train sets is the great divide - between modellers who strive for exact replication of real life, as against most of the kids I know (old pretend kids as well as real kids) for whom the toy's the thing. This model was based on an Australian diesel engine, but Tri-ang added the "pantographs" - the roof top collectors - to make it work with overhead power supplies.
A couple of weeks ago we took this model to a local train fair. I had finally given up trying to get it to run. There we met Dr John the Train Doctor - very clever at fixing model trains. A friend of his told me that this model was altered by Tri-ang to try and break into the American market, where overhead power was considered essential. He said the Americans didn't take to this model and surplus stock was brought back to the UK. Meanwhile Dr John was checking out the inner workings of the model. The problem, it turned out, was simple - inside the motor there is a wire spring, one side of which is sheathed. The sheath prevents a short circuit - but I hadn't spotted that the sheath had worked itself back so the spring was shorting out the two sides of the motor. Easily fixed - if you know how. (I plan to come back to the inner workings of the R257 in another posting).
But our problems didn't just end with the train itself. We had enormous problems with setting up the catenary. The wires have to sit above the centre line of the track. That's easy when the track is straight, but on a curve you have to bend the wire by hand to match the radius of the curve. As the train moves around a bend, the pantographs move away from the centre line. If the wire is too close to one side or the other, the pantographs slip past the wire and then - CRASH - the pantographs hit the next catenary mast. I seem to have spent days bending and re-bending the wires to get the curve just right. And now - it works - and its a marvel!
The Tri-ang R257, with "Tri-ang Railway" markings is said to be very rare these days. Catenary sets from Tri-ang are also a bit difficult to track down - ebay had a couple in the last three or four days, but both were incomplete sets. I have always loved this train - and there is something special about seeing it powered from above. My son and daughter have loved working with me to get the whole setup running - and there is something special about that as well!
Monday, 24 January 2011
It works! Well almost...
It's sort of natural to kick off a new blog with - why? My why is probably fairly commonplace. We bought my son a train set when he was younger - too young probably. And one oval of track obviously (yes, obviously ) isn't enough. So I wondered if the old set I used to have was still in the loft? It was and that started me on a long road of discovery. You see my 40+ year old toy trains worked - almost. All sorts of complications awaited me - from track geometry to mending old motors. And I couldn't have done it without lots of help, often found on the interweb. And yet as I have gone along there are things I have found difficult to find out about, some things I have discovered (probably wasn't looking in the right place), and it just feels right to try and give something back - to see if my travels on a train set might help other dads (and mums - if you are out there...) (and grandads/grandmums/uncles/aunties/carers of all descriptions and Uncle Tom Cobley - although he favoured horses didn't he?).
My first set was by Playcraft. I then moved onto Tri-ang. I have a very nice French diesel loco from Jouef. And now my son has found modern Hornby. But I am getting ahead of myself. I have to tell you about our test layout with overhead supply using catenary - before its ousted from the dinner table to make way for a Burns night supper at the weekend. All I have to do first is see how I can get some pictures onto Blogger. Come back soon and see if I manage it!
My first set was by Playcraft. I then moved onto Tri-ang. I have a very nice French diesel loco from Jouef. And now my son has found modern Hornby. But I am getting ahead of myself. I have to tell you about our test layout with overhead supply using catenary - before its ousted from the dinner table to make way for a Burns night supper at the weekend. All I have to do first is see how I can get some pictures onto Blogger. Come back soon and see if I manage it!
Subscribe to:
Posts (Atom)